We recently published an open source starter template that helps developers get started quickly building with StatelyDB on the Netlify platform. This tutorial will walk you through the example application the starter template uses and how to get your own copy deployed to Netlify.
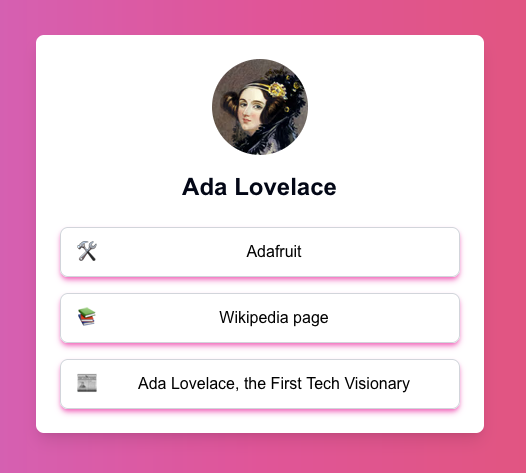
Our example app is a simple “Link in Bio” profile page, similar to Linktree or about.me, which displays a name, photo and a collection of links. Here’s what our sample site looks like:

Live demo: https://statelydb-demo.netlify.app/.
Github Source: https://github.com/StatelyCloud/netlify-starter-template
The very first thing we need to do is get our own Stately Cloud account so we can set up a StatelyDB Store. We’ll do that by visiting the console. If you don’t have an account yet, go through the sign-up process and follow the instructions in the console to get a new Store created.
You’ll want to grab the Store ID listed in the console:

You will also need an Access Key which you can create in the console by clicking on the Access Keys link in the sidebar and then clicking the New Access Key button.
Our app defines a basic Schema in the schema/schema.ts file, which looks like this:
import { itemType, string, uint } from "@stately-cloud/schema";

itemType("Profile", {
  keyPath: "/p-:id",
  fields: {
    id: { type: string },
    fullName: { type: string },
  },
});

itemType("Link", {
  keyPath: "/p-:profile_id/l-:id",
  fields: {
    id: { type: uint, initialValue: "sequence" },
    profile_id: { type: string },
    title: { type: string },
    url: { type: string },
    emoji: { type: string, required: false },
  },
});
We have two Item Types: Profile and Link.
A Profile contains a unique identifier and a full name, both of which are strings. Our app isn’t used by multiple users, so we use a default value for the identifier (default). The Profile has a Key Path like /p-default.
Every Profile has a collection of Links. A Link contains a field that references the Profile identifier, as well as a title, url and emoji. Note that the structure of the Key Path for a Link looks like /p-default/l-1, which means each link is nested under a Profile and can be efficiently retrieved using the List operation with a prefix.
Here’s an example of visualizing this structure:

We’ve already done the work of generating TypeScript client code that lets us use these Item Types, which you can view in the src/lib/generated folder if you’re curious.
Our app defines a set of helper functions for interacting with our StatelyDB Items at src/lib/actions.ts:
"use server";

import { keyPath } from "@stately-cloud/client";
import { statelyClient } from "./stately";

const profileSlug = process.env.PROFILE_SLUG || "default";

export async function fetchProfileWithLinks() {
  const links = [];
  let profile = null;
  const iter = statelyClient.beginList(
    keyPath`/p-${profileSlug}`
  );
  for await (const item of iter) {
    if (statelyClient.isType(item, "Link")) {
      links.push(item);
    } else if (statelyClient.isType(item, "Profile")) {
      profile = item;
    }
  }
  return { profile, links };
}

export async function createLink(formData: FormData) {
  const title = formData.get("title") as string;
  const url = formData.get("url") as string;
  const emoji = formData.get("emoji") as string;
  const link = statelyClient.create("Link", {
    title,
    url,
    profileId: profileSlug,
    emoji,
  });
  await statelyClient.put(link);
}

export async function deleteLink(id: bigint) {
  await statelyClient.del(keyPath`/p-${profileSlug}/l-${id}`);
}

export async function renameProfile(newFullName: string) {
  const profile = statelyClient.create("Profile", {
    id: profileSlug,
    fullName: newFullName,
  });
  await statelyClient.put(profile)
}
This single file handles all of our database modifications — the rest of the app code is UI! You’ll notice that the fetchProfileWithLinks function uses the beginList operation and supplies a Key Path prefix that will match both the Link and Profile Items. This means we’re able to query multiple records, of different Item types, by Key Path prefix. The other functions show how easy it is to use the types from our Schema to create, edit and delete Items without needing SQL or other boilerplate.
First we’re going to check out the starter repo:
git clone https://github.com/StatelyCloud/netlify-starter-templateNext we’re going to create a new Netlify site. You will need to be logged in to the Netlify CLI first:
❯ netlify sites:create
? Team: Stately
? Site name (leave blank for a random name; you can change it later):

Site Created

Admin URL: https://app.netlify.com/sites/delicate-yeot-198b9f
URL:       https://delicate-yeot-198b9f.netlify.app
Site ID:   3b6284e4-4c34-4cd2-9d0d-09c910078fdd

Linked to delicate-yeot-198b9f
Now we have a site, but it needs to be configured before trying to deploy. Change the environment variables here to match the values from your Stately Cloud account:
netlify env:set NEXT_PUBLIC_EDITABLE true
netlify env:set PROFILE_SLUG default
netlify env:set STATELY_STORE_ID your_store_id
netlify env:set STATELY_ACCESS_KEY your_access_key
…and now install the npm dependencies and run a local server:
npm install
netlify dev
And that’s it!
If you’ve followed the steps above you’re well on your way to getting started using StatelyDB with NextJS on Netlify. We know that StatelyDB can handle high scale, but it’s also great for smaller sites because of the flexibility of Elastic Schema. But even better, with StatelyDB you won’t have to worry about planning for the future because you can change your mind later about your data model.